Last updated 07/16/2025
tl;dr of this guide: getting a domain name, setting up a server (VPS), configuring nginx for HTTP and HTTPS hosting, FTP server for remote file editing capabilities from older machines
I'm getting more and more into retro computing, and I was pleasantly surprised to see that there's a decent number of people online hosting things on HTTP as well as HTTPS. (For a fun list of sites, check out the bottom of my Hoarde page.) From a bit of searching, I never found a very comprehensive guide about hosting something for computers both old and new, since hosting on HTTP is a pretty big no-no in serious web development.
What's the deal with HTTP and HTTPS anyways? A ton of the web was on HTTP for a while which was fine for basic sites that don't ask for any information like logins or credit card information. As time has gone on though, sites have gotten more complex and ask for (or steal) more and more information, which can be more easily stolen or modified mid-transmission over HTTP. With HTTPS, a secure tunnel is made from point A to point B so that it's harder to intercept. Check out this funny little article I found about this for some more on the history of HTTPS adoption.
However, there are still a handful of sites like mine out there that don't really have to worry about hackers stealing my visitors' credit card information because I won't be asking for that on here. (OR WILL I?!) (No)
So going out of your way to do this is really just for the fun of it, to make your website available on older computers as well. It involves the amount of risk you're personally willing to take as well, because theoretically someone could intercept the transmission of my HTML files to you and modify it to say something scandalous I suppose. But I'm not sure I have any enemies that would go out of their way to do that. Hopefully!
Then again, if someone really wants to hack me, anything is hackable if you try hard enough.
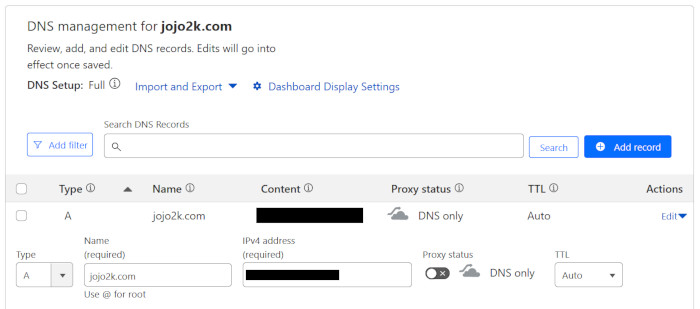
You probably want a more humane website name rather than your IP, so make sure you have a domain. (Actually, if you want to exist over HTTPS, you NEED a domain name.) Hop on Cloudflare bro. They have good prices for what you get - great support, intuitive dashboard, robust settings.
Some Cloudflare-specific things you want to look at include:
Unless you're really brave and want to host your website from your home, then you probably also want a VPS. My poison of choice is Vultr. This means that the server will be away from your home and hosted in a way that all but guarantees constant up-time for your website and keeps your home bandwidth/data usage sane compared to hosting it yourself at home.
Given that their site and account stuff changes, I will leave it to you to make your own server. If you have an inkling of interest in this stuff, then you should be able to find a good tutorial on this, and if not, you should probably start with some other Linux tutorials first (not being snarky, you'll just want the skills). See about starting a VPS with Ubuntu 24.04.
There are also many different options and pricing for storage, compute power, data usage, etc. Obviously, depending on the kind of site you're making, choose what fits your needs here.
I'm also gonna be real "cheap" here and pass this off to another tutorial too, but this time I have a specific link for you.
You can really go through that whole tutorial and make sure that you can host a web page. IN MAKING WEB PAGES WITH YOUR OWN SERVER, MAKE SURE YOU WATCH FILE PERMISSIONS! By default in your Linux terminal sessions, you will probably be making web pages that are not immediately "accessible" by the server's NGINX user that ultimately ends up serving the web pages to visitors, but we can actually worry about that later in a nicer FTP interface. But if you get a 403 error when trying to visit your first web page, you're on the right track - just look up the "chmod" and "chown" commands if you want to get your hands dirty in the terminal now.
Now, the kicker to serve things over HTTP. After following the above tutorial and getting NGINX and Certbot configured, Certbot will change your NGINX configuration to disallow connections to your site over HTTP (port 80). Delete those parts that explicitly deny HTTP and add something like this as a separate entry underneath your main server{} entry in the .conf file (/etc/nginx/sites-available/) -
server {
listen 80;
listen [::]:80;
server_name jojo2k.com;
root /var/www/jojo2k.com;
index index.html;
location / {
try_files $uri $uri/ =404;
}
}
As you can probably glean from the above code, this has NGINX also listen for connections over HTTP in port 80. With this and the full config above in the .conf file filled out by Certbot, users on both old computers without HTTP and new computers can type something like "jojo2k.com" into their browsers and will get the highest protocol they're capable of. (As in: old computers will automatically connect over HTTP, newer ones will get the HTTPS connection they so crave.) Fun!!
Assuming you're still on Vultr with me here, they have another tutorial that covers setting up FTP well. Check this out.
Now why would we want FTP for file sharing on our VPS when some providers have prettier ways of interfacing with servers and files? In our use case, FTP has been around for decades at this point and is compatible with computers well back into the early 90s. This means that if a computer can get online and has an FTP client, you can actually manage your entire website from an older computer once you're finished with this setup.
This might be an area where some draw the line, since this part DOES involve passing login information and files over an unsecure connection, so again, all of this is at your own risk and discretion. Make a super strong password, change any default passwords, consider disabling SSH or anything else that would allow remote terminal access to your VPS, don't make any enemies, and you should probably be fine.
I never thought I'd write something like "cute FTP client" in my life, but here we are. But you gotta check out Transmit for your PowerPC Mac computers. Look at that icon, that interface. That's adorable. You're telling me a little truck is gonna carry my files over the information superhighway using FTP? Delicious.
The FTP client is where I end up dealing with my file permissions to avoid 403 errors. Most clients I've seen from FileZilla to Transmit all have GUIs for editing file permissions. Make sure that you're adjusting them accordingly so all users have read access and so on. I'm not the security expert here, so your next project on your server is to make sure that the users and files you've set up have sane permissions for various actions and file access, hehe...
There you have it! Now your retro-style web page is 100% period accurate since you can access it on older systems now. Just make sure not to use any fancy HTML5 functions that older computers can't understand. Me personally, I'm even pledging to avoid JavaScript here so it stays nice and fast too :3
See you, space cowboy...
Click here to go back to the main Works page.